Below is a summary of our October session that can also be found at: http://blogs.acpsk12.org/tlpc/2014/11/05/what-a-skitch/
A big thank you to Lois Lansing, 3rd grade teacher from MacArthur Elementary School, for sharing how she has used Skitch in the classroom. It was so helpful to hear her ideas about how she used Skitch and to listen to stories from her classroom. If you missed our live session, you can watch the recording by clicking right here:

Recording of TLP-C Skitch Lessons You Can Use October 30, 2014
Skitch is an app as well as a desktop application that allows you to annotate images with captions, arrows, and other drawing tools. This is a great tool for anytime you want students to show what they know about an image. And, it is a great tool for app-smashing because the images you annotate in Skitch can be pulled into other apps or software or websites to create awesome digital stories and presentations.

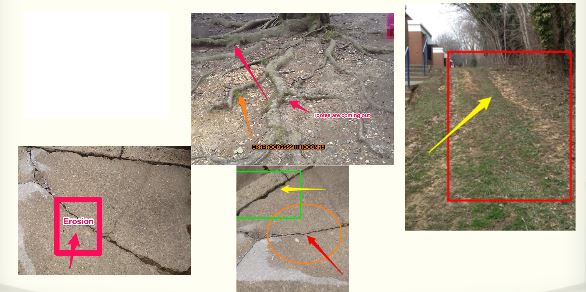
Lois shared a wonderful lesson she did when she was a 2nd grade teacher. After spending a few days learning about erosion, students were charged with the task of identifying erosion around their school building. Students then used Skitch to annotate those pictures: using arrows to draw attention to what they saw, using text boxes to explain what they saw and using other drawing tools (circles, squares) to highlight these examples of erosion. Next, Lois had the students import their Skitch images into PowerPoint to make recommendations about what the school should do to improve the school and slow down the erosion.
As we discussed using Skitch, we talked about some good tips like:

Another great tip Lois shared was that you can use the blurring tool in Skitch to blur students faces. So if you want to post public pictures of students but don’t want them to be identifiable, you can use this helpful tool to do so!
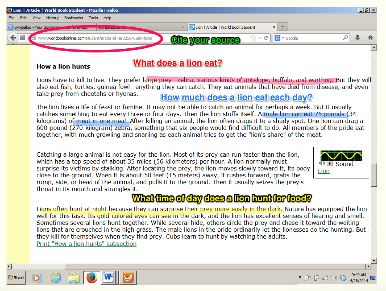
Lois shared another fantastic way to use Skitch which is for highlighting text features. This was a really neat idea where students could highlight topic sentences, add questions they have, or even point out citation information like the URL for the website. More ideas that were shared were:
Recording of TLP-C Skitch Lessons You Can Use October 30, 2014
Skitch is an app as well as a desktop application that allows you to annotate images with captions, arrows, and other drawing tools. This is a great tool for anytime you want students to show what they know about an image. And, it is a great tool for app-smashing because the images you annotate in Skitch can be pulled into other apps or software or websites to create awesome digital stories and presentations.
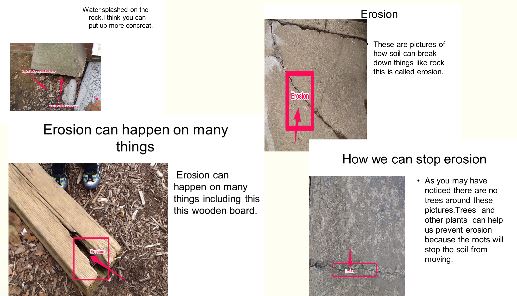
Lois shared a wonderful lesson she did when she was a 2nd grade teacher. After spending a few days learning about erosion, students were charged with the task of identifying erosion around their school building. Students then used Skitch to annotate those pictures: using arrows to draw attention to what they saw, using text boxes to explain what they saw and using other drawing tools (circles, squares) to highlight these examples of erosion. Next, Lois had the students import their Skitch images into PowerPoint to make recommendations about what the school should do to improve the school and slow down the erosion.
As we discussed using Skitch, we talked about some good tips like:
- giving students some “play” time to take selfies and learn the Skitch tools
- be clear about expectations if taking iPads outside
- have iPads set up to email images to teacher to use the images with other applications on the computers OR set up Dropbox accounts on iPads for image sharing
- partner students to promote collaboration
Another great tip Lois shared was that you can use the blurring tool in Skitch to blur students faces. So if you want to post public pictures of students but don’t want them to be identifiable, you can use this helpful tool to do so!
Lois shared another fantastic way to use Skitch which is for highlighting text features. This was a really neat idea where students could highlight topic sentences, add questions they have, or even point out citation information like the URL for the website. More ideas that were shared were:
- let the students take the selfies and then label (eyes, ears, nose) in a target language (Spanish, French, Chinese, etc.)
- take pictures of student artwork and have students label skills they are working on (perspective, lines, negative space, etc.)
- have students make addition stories using counting bears and use Skitch to explain the addition
- take pictures of primary sources or maps and have students label important items


 Science: Make a Voki to explain the outcomes of a lab. (I've seen students do this for their Science Fair presentations!)
