Pages

Showing posts with label Digital Storytelling. Show all posts

Monday, April 10, 2017

Keeping the "We" in WeVideo

I am lucky enough to work in a school district that uses WeVideo as part of our 1:1 Chromebook approach to blended learning. If you aren't already familiar with WeVideo, it is a fantastic tool that let's students create, edit and publish videos in the cloud. Students can collaborate on projects and teachers can create sets of media for students to use for video projects. Finished videos can be downloaded or uploaded directly to Google Classroom. It has been loads of fun getting to know this powerful tool for student creativity this year. I have been a part of really innovative WeVideos and I've been a part of WeVideos that felt like any other school assignment that gets completed just because it was assigned. Here are some of my observations of what makes a WeVideo stand out in terms of the student learning experience.

https://goo.gl/images/fq2GRY
Collaboration. An obvious plus to WeVideo is the ability for multiple students to work on a video project at the same time. In the world of Google Docs and Google Slides, students have come to expect to be able to share a project with a classmate and have dual editing rights. WeVideo is a little tricky this way since only one student can be editing one video clip at any one time. This can be a great benefit though since it creates the need for more coordination, communication and planning among the students. For instance, if two students are making a Google Slide presentation together, two things often happen. One, the students divide up the slides and they each make their slides without checking in with each other about the content or style of their slides. Two, one student does all the work. With WeVideo, students need to plan out the video into media and video edits. Some students can be responsible for gathering the media needed: images, video filmed via phones, photos, music, audio. Other students can be responsible for assembling the media into a video edit. This creates a natural need for students to truly collaborate and not just divide up the work. The editor needs to be able to tell the media managers what they need. The media managers need to check back in with the editors to see how the media works in the videos. Being intentional with students about this is essential, helping students understand how the program works and how to communicate with other students will make the video project much more enjoyable and the final product much more meaningful for all.

Student Created Rubrics. Let's face it. Our students are huge consumers of video. They know what makes a good video and what makes a great video. Make sure to take some time to have students brainstorm what makes a quality learning video. Ask students to work in pairs to identify the characteristics of videos that are informative while fun to watch. Use their thoughts and ideas to build your rubric. Of course, you likely will have to add some components that students might not consider but having their buy-in on what the final products should look like will pay off in the long run. As you do more and more video products, be sure to save the quality examples. Show these to students and have them evaluate what makes them good. You will see an exponential increase in the quality of what students produce. They will feel much more connected to the project when they have helped build the rubric.

Student Reflection. Here's the great news, you've already laid the ground work for this one! Remember that student-built rubric you made with the students? Now, they can look at the rubric and reflect on what they did. In addition to checklist types of reflection questions (did you do this? did you have this?) be sure to include questions about what they learned from the project and, most importantly, what they would do differently next time. I always find that I learn as much from what students put in their project reflections as I do actually viewing the project itself. This also gives students another opportunity to share their view of the project. As educators we need to keep our focus on how students are experiencing the learning opportunities we provide in our classrooms.

https://goo.gl/images/ZbSY9W
Celebration. There is nothing worse than working really hard on a project and having your teacher move right on to the next topic, or the next project. Be sure to take time to celebrate the products students have created. Whether you have a movie day where you watch each of the projects or you have an evening presentation where parents are invited, be sure to plan time to view and celebrate the projects. This is a great opportunity to invite your administrators in or at least the tech coaches (we love this stuff!!). Consider having students write positive notes to their peers about each video. While sharing a glow and a grow is common practice, I find letting students just focus on the "glow" provides a more positive flow in the room and gives us all a chance to go full circle back to that original question of what makes a quality learning video.

I'm sure it is very intentional that the first ISTE Standard for Students is Empowered Learner. The Empowered Learner is one that "takes an active role in choosing, achieving and demonstrating competency in their learning goals, informed by the learning sciences."* Keeping this in the forefront of our minds when planning video creation lessons will ensure that students see themselves as part of the process, not something the process happens to.

*2016 ISTE Standards for Students, ©2016, ISTE® (International Society for Technology in Education), iste.org. All rights reserved.


Monday, June 22, 2015

Storytime with StoryKit

Sometimes the simplest apps can make the most powerful lessons.

A few weeks ago, I was brainstorming a lesson with a 7th grade Life Science teacher at my school. She had a unit on symbiosis coming up and she wanted to assess the students in a new way. We bounced around a lot of ideas: green screens, music videos, cartooning sites but what we landed on was StoryKit. StoryKit is a free app from the folks at the International Children's Digital Library (which is a great resource in itself if you aren't already familiar with it!).

StoryKit lets you create a digital book. For images, you can draw your own, import from the web or use your camera roll. You can simply add text with a text box. You can arrange and format the images and text as you like. A great feature of StoryKit is that you can add audio. Just click and record yourself reading the story out loud. You can even record word by word or sentence by sentence! This was just what we were looking for, a tool that let's the students' creativity shine without too many features or distractions in the creation. And... and.... what if we planned on reading the stories to an 2nd grade class at a nearby elementary school?

My job was to introduce the tool which was easy because StoryKit is so intuitive. I just walked the kids through the features and made a silly story as a sample. Students literally had no technical questions or problems. If there weren't sure how to do something, they quickly figured it out or asked a friend. It was seamless.

Their stories were fantastic. The teacher assigned a symbiotic relationship to each group of students. The task for the group was to write a children's story that told a story about that relationship. She made a model first to show them and reinforced Language Arts skills by using the same story graph that their Language Arts teacher had used with them earlier. Kids came up with adorable ideas and clever plot twists to demonstrate what they knew about symbiosis. And the best stories would go in person to an elementary school to read to a class. Here are a couple of my favorites:

Sloth and Algae Reunite
Lola and Charlie
Sandy and Randy's Adventure: Lost at Sea

I might have loved these stories, but the 2nd graders loved them even more. We had a great morning where the 7th graders first had to explain the four types of symbiotic relationships in 2nd grade terms (smiley faces did the trick) and then read their stories in small groups. The 2nd graders learned so much - they could identify the type of relationship in every story. And the 7th graders learned so much - how to explain what they know in a compelling, interesting and memorable way.

What I learned from this lesson:

  1. The simplest apps are often the best
  2. Having a real audience for school work results in better school work
  3. Asking students to explain what they know in simple terms demonstrates whether they know or understand an idea
  4. 7th graders are their best selves for 2nd graders
  5. Kids learn when we tell and share stories
And guess what app the 2nd graders asked to use next time they could use iPads?

Wednesday, November 5, 2014

What a Skitch!

One of the great things I get to do at my job is to facilitate a teacher-led professional development series called TLP-C. Basically, we meet online monthly and teacher shares a cool tool they've tried in the classroom. We learn a bit about the tool, hear about how the lesson went, talk about advantages and disadvantages and share ideas about integration. It is a great low-key, high-impact professional experience.

Below is a summary of our October session that can also be found at: http://blogs.acpsk12.org/tlpc/2014/11/05/what-a-skitch/

A big thank you to Lois Lansing, 3rd grade teacher from MacArthur Elementary School, for sharing how she has used Skitch in the classroom. It was so helpful to hear her ideas about how she used Skitch and to listen to stories from her classroom. If you missed our live session, you can watch the recording by clicking right here:
http://blogs.acpsk12.org/tlpc/files/2014/11/erosion1-2k4lrdz.jpg
Recording of TLP-C Skitch Lessons You Can Use October 30, 2014

Skitch is an app as well as a desktop application that allows you to annotate images   with captions, arrows, and other drawing tools. This is a great tool for anytime you want students to show what they know about an image. And, it is a great tool for app-smashing because the images you annotate in Skitch can be pulled into other apps or software or websites to create awesome digital stories and presentations.
erosion2

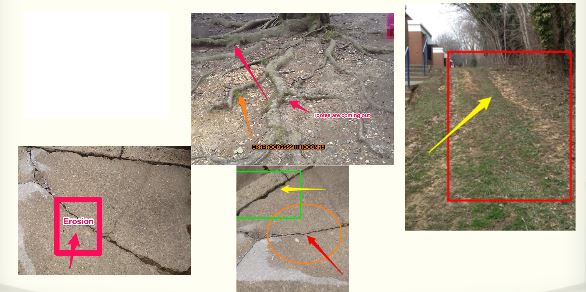
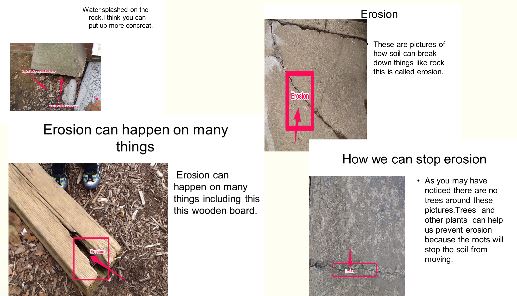
Lois shared a wonderful lesson she did when she was a 2nd grade teacher. After spending a few days learning about erosion, students were charged with the task of identifying erosion around their school building. Students then used Skitch to annotate those pictures: using arrows to draw attention to what they saw, using text boxes to explain what they saw and using other drawing tools (circles, squares) to highlight these examples of erosion. Next, Lois had the students import their Skitch images into PowerPoint to make recommendations about what the school should do to improve the school and slow down the erosion.

As we discussed using Skitch, we talked about some good tips like:
  • giving students some “play” time to take selfies and learn the Skitch tools
  • be clear about expectations if taking iPads outside
  • have iPads set up to email images to teacher to use the images with other applications on the computers OR set up Dropbox accounts on iPads for image sharing
  • partner students to promote collaboration
text-mark-up

Another great tip Lois shared was that you can use the blurring tool in Skitch to blur students faces. So if you want to post public pictures of students but don’t want them to be identifiable, you can use this helpful tool to do so!

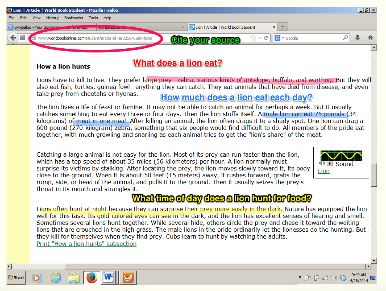
Lois shared another fantastic way to use Skitch which is for highlighting text features. This was a really neat idea where students could highlight topic sentences, add questions they have, or even point out citation information like the URL for the website. More ideas that were shared were:
  • let the students take the selfies and then label (eyes, ears, nose) in a target language (Spanish, French, Chinese, etc.)
  • take pictures of student artwork and have students label skills they are working on (perspective, lines, negative space, etc.)
  • have students make addition stories using counting bears and use Skitch to explain the addition
  • take pictures of primary sources or maps and have students label important items
Have your own ideas about using Skitch or questions about how to use Skitch? Leave a comment below!!


Wednesday, April 2, 2014

Messing around with Green Screens

We been having a fun time these last few weeks messing around with green screen technology. It has been a lot of fun and we've learned a lot. (And it gave me a reason to clean out our "studio" - yea!).

If you've never tried green screen before, there are lots of ways to do it. In fact, when we do it, it isn't even a green screen, it is a blue one! The first step is to have a blue curtain or to paint a wall blue. In the past, I've even taped a blue sheet up to a wall and got pretty good results.

Next you add some code to Windows Movie Maker. If you aren't a computer programmer or if coding sounds intimidating to you, don't worry. I found the instructions here: http://www.wikihow.com/Chroma-Key-in-Windows-Movie-Maker super easy to follow. You do need to have the older version of Movie Maker though, the one for Windows 7 doesn't seem to work.

Once you add the Chroma Key, all the rest is a matter of editing in Movie Maker. The directions above take you through the rest of the steps. I've also written them out here: Greenscreen Directions if you are interested.

So besides feeling like a rock star when you figure out how this works, watching to kids videotape and edit is really fantastic!

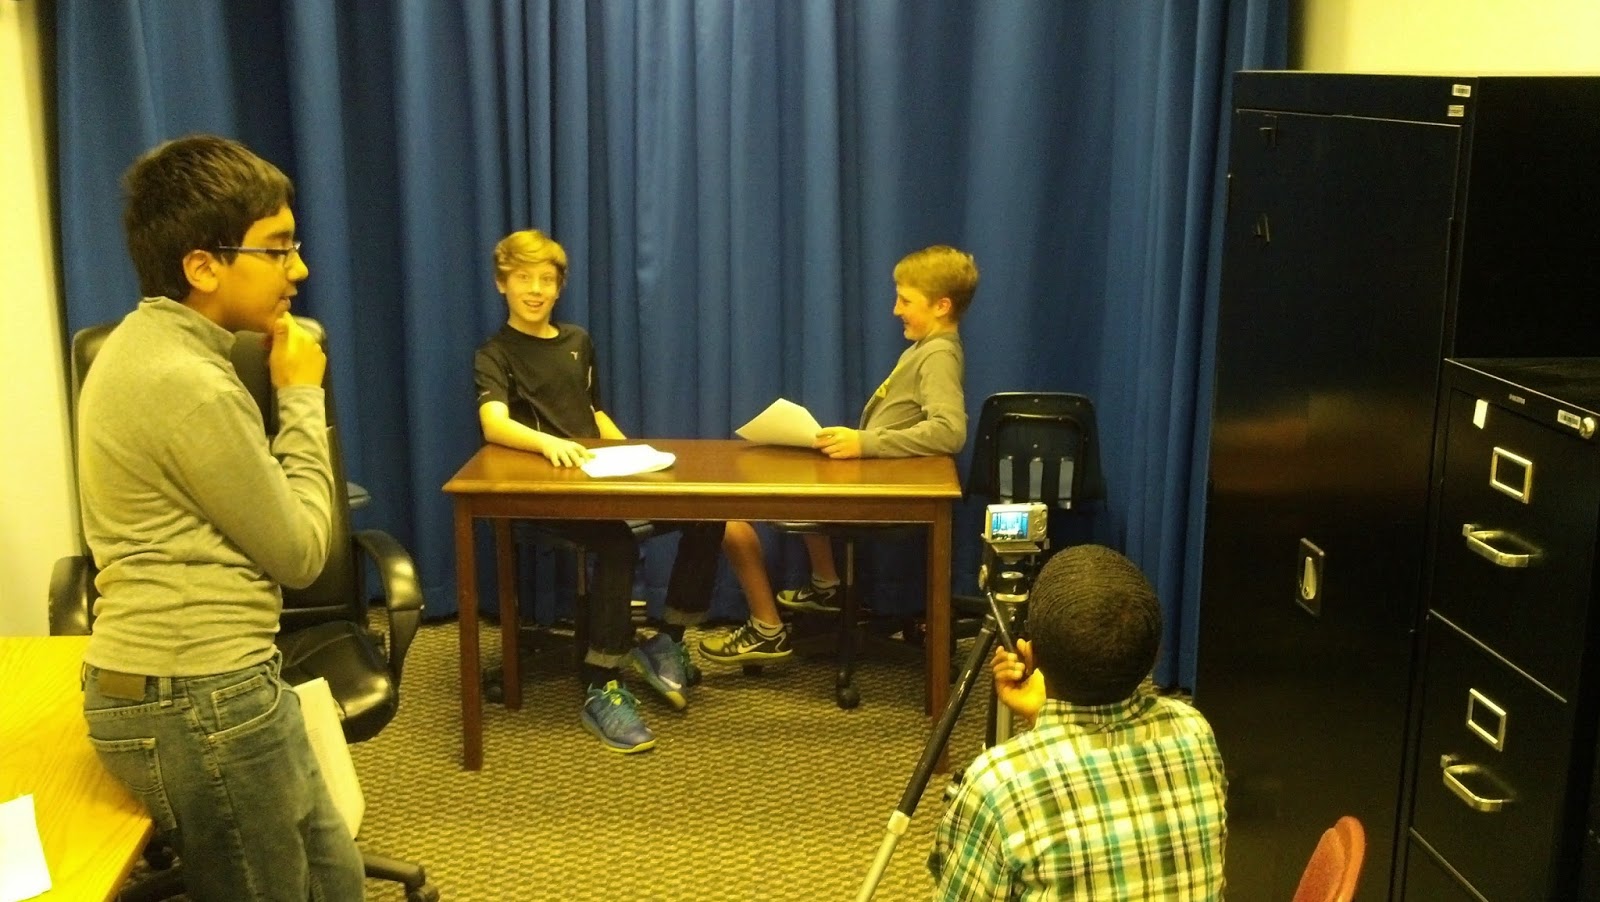
The class I worked with had prepared skits ahead of time and came in "the studio" ready to film. I had a camera and tripod set up, but they did the rest. The filmed, transfered files from the camera to the computer and followed the directions for editing in Movie Maker.

They loved, loved, loved filming. Their skits were clever and creative and they could have recorded and re-recorded themselves all day. Gotta love 6th graders. TIP: tell students they only get 1 take!

The also loved, loved, loved finding images for their background. We found that color pictures worked best and that anyone that wore a blue shirt in front of the blue curtain disappeared when we applied the green screen! TIP: make sure students wear clothes that are a different color than your background!

Now, when it came to the editing, it definitely required more attention to detail and not all the kids were up for that. But, there were a few kids in each group that shined at this part. Maybe they hadn't been the ham in the skit or the director that remembered all the props, but when it came to understanding the editing process, they were experts. It was really interesting to notice how hard this part was for many students. It made me continue to think deeply about how we can offer more technology process opportunities for students in schools. More students need to be good at this step, understanding how the program works and that they can conquer it.

There is nothing like watching kids create a video that they've created start to finish. Greenscreen is no small undertaking but the outcomes are worth it!

I'd love to hear how others have used greenscreen and their ideas and tips about it!

Tuesday, April 9, 2013

Website of the Week - Pixlr

Need to make some quick adjustments to a digital image but don't have Photoshop? Try out Pixlr, a free, online photo editing website. Pixlr has three levels: Playful, Efficient, and Advanced to suit your editing and tech savvy needs. Want to get rid of wrinkles? Airbrush out that antenna you didn't notice? Add text or a border? Pixlr can do it all. Perfect for student multimedia projects.


See if you can find the antenna I airbrushed out of this picture! Pixlr is so eary to use, editing this photo only took me about four minutes. This is a great solution so students that want to do editing to images for their digital stories, prezis or animotos!

Wednesday, June 20, 2012

Fine 'Tooning


with Toontastic

One of my favorite things about the iPads and the apps that have been developed for them is the opportunity for students to show what they know in new and creative ways. A great example of this is the app Toontastic.

Toontastic is a story-telling app. Its stand-out feature from other story-telling apps or software is that it provides the skeleton for the basic elements of a story – setting, conflict, resolution and conclusion. What happens is that when you open the app, you are invited to make a new cartoon. As you do so, the app displays a visual of this story arc. This encourages the author or cartooner to consider more than just how the story will start, but how the story will build and then be resolved. I love this aspect since we’ve all seen too many digital stories where the visuals are wonderful but the story-telling is lacking.

Another great aspect of Toontastic is that it is scaffolded in a way that a very young child could use it with very limited support (ask my 5-year-old about this). However, it is also sophisticated enough that a high school student can tailor the app to fit his or her creative ambitions (ask the ninth and tenth graders I worked with last week). The scaffolding happens this way: there are already scenes drawn for you and animated characters created that you can choose. For instance, you can select a pirate boat, desert island, and ocean scene with pirates, sharks and crabs. This is great for simple story telling, again, ask my son who has made endless stories about these pirates. Or, you can draw your own scene, tailor the animated characters or create your own characters. This is what the high schoolers I worked with did to describe the four agents of erosion. They amazed me with the sophisticated drawings they made or the creative decisions they made about designing their own characters that they could animate.

From an educator’s perspective, Toontastic gets five stars for student engagement. When I first introduced Toontastic, I made my own sample story. I had a good time creating it and laughing at myself as I showed it to the kids. They were amused, but what got them to the edge of their seats was when I showed them how I made the little movie. I could see their posture change as they realized they were going to be able to create their own movie using this app. Students would so much rather have the chance to make something original and imaginative than complete a worksheet or watch a dated movie clip.

In addition to the cartooning piece of Toontastic, students can also record their voice and add (pre-set) music to their films. This is one of my favorite aspects of Toontastic but one of the hardest sells for high school students. Some students did a great job with this, writing out what they were going to say, practicing and perfecting it until they were satisfied. Others shied away or avoided this aspect in any way they could manage. As I do more with Toontastic and high-schoolers I think I will do more to get them ready for recording their voices. I hope that in the future, we can create instructional cartoons that we would show to a younger grade level to teach a concept. I work with a number of bilingual students and it would be so great if they would make ‘Toons in their home language that could be used in classes with native speakers.

One other take-away from my first go ‘round with Toontastic had to do with saving work. Toontastic saves the settings each student creates and even the story they are working on, which is great. What is tough with iPads though is that when the next class sits down to use them, they can see all the previous classes’ work. Actually, seeing it I don’t mind at all, deleting it, I mind a lot. On our first day we had two different students delete other students work. I was devastated when I realized what had happen. Those first kids had worked so hard, only to have it gone by the end of the day. This helped me learn a few things:


  1. Be sure to know which student is using which iPad – whether this is through a sign-out sheet, permanent assignment of iPads or another system, accountability breads responsibility
  2. As soon as a student feels their ‘Toon is done, upload it to the Toontastic website. Toontastic has a website associated with their app where all the ‘Toons can be viewed. Once the ‘Toons are up there, only the teacher can delete them.
  3. Be clear about expectations with the iPads. I feel we had done a good job talking about handling the equipment safely and staying on task, but I had not been specific about respecting other students’ work. I am now. *smile*


The other lesson learned is the same lesson I learn over and over again.

Be clear about expectations for the assignment


Our first try with Toontastic yielded really uneven results. I think that is definitely because there wasn’t a clear assignment sheet explaining what we were expecting. While the classes I was working with were small and we frequently reminded students of what they needed to do, a hard-copy assignment sheet laying out expectations, maybe as a checklist would have made a big difference. I swear, I will always require this of teachers I work with in the future.

I am less certain about the requirement to do a story board or rough draft before jumping into an app. These apps generate so much innovation, I’m wonder if a rough draft would limit the resourcefulness of the students. Students often thought of ways to show the content (agents of erosion, the rock cycle) that they probably wouldn’t have consider until they started using the app. Similarly, they might have had an idea in their storyboard that they couldn’t recreate in the app. I am still debating about this part of digital stories. I feel like more planning would make for better projects, but I’m not sure at what point this should happen. I’m wondering if you let the kids create for 20-30 minutes and then have a check-in point where partner’s review each other’s work and give suggestions. This has the added benefit of students getting ideas from each other and students practicing giving productive feedback.

So, as you can see, I’m still Fine ‘Tooning my work with Toontastic. I would love to hear from you what projects you’ve tried with this app! Or what suggestions you have about how to use it effectively in classrooms. Or, if you teach Kindergarten to Grade 5 and would like to collaborate, with my students teaching your students new concepts through Toontastic!